Search This Blog

Wednesday, September 14, 2011

Not Your Ordinary Foam Pumpkin

The boys have finally decided what they want to be for Halloween! In an effort to fit in a few "Fall" crafts before baby 3 makes his or her appearance, we decided to decorate foam pumpkins to match the boys costumes.
The boys thought this was so much fun!!!
Their favorite part was shaking the glitter on the glue, tapping it off and watching the design of the glue appear. They clapped and laughed!
SO, take an "ordinary" foam pumpkin and turn it into your unique creation.
Here are some other ideas too! Happy decorating!!!!


Tuesday, July 26, 2011

BUCS Pillowcase Dress and Bow Tie Shirt


Pillowcase Dresses are a must have for Summer! Check out this dress and bow tie shirt made for a friend's little girl and boy.
These are super easy to make!! Check out the below site for exact instructions.
http://bumblebeelinens.com/pillowcaseDress.php

Wednesday, July 6, 2011

No Sew Fabric Flower Onesie


Back in June I did a tutorial on how to make a "No sew fabric flower". (For that tutorial, simply click on June and go to "no sew fabric flower".)

Well I decided to spice things up a little and turn a plain onesie into a fabulous one!


You may know that I am pregnant and due in about 3 months. Well, we do not know what we are having, but I will be bringing this to the hospital just in case it's a girl. I also made a matching headband. This is such an easy thing to make. Make one for a shower or baby gift!

Kids Floor Pillow - Shabby to Spiderman Cool


So, about a year ago I bought these big ugly rectangular pillows at Ross for $10 a piece. I knew I wanted to recover them, and FINALLY did!
These pillows are "semi-homemade" seeing as though I did not make the full pillow. You could make your pillow very easily though. Check this "e" site out. You can follow the directions and make it the size you'd like. http://www.ehow.com/video_4433955_sew-pillow.html

Back to our pillow:
The pillows I bought had a blue corduroy and a soft light blue side. I decided to keep the blue corduroy side. So, first I spread out the spiderman fabric over the light blue side of the pillow and cut out a piece, leaving a couple of inches around the perimeter of the pillow.
Next, I folded the fabric to the edge of the pillow and pinned around the whole pillow.
Lastly, I simply did a whip-stitch (this is by hand) all the way around the pillow.

If you are not familiar with a whip-stitch, check out this video of how to do one.
http://www.ehow.com/video_4940669_sew-whip-stitch.html

Friday, July 1, 2011

Paint, Paint, Paint!


A new painting for a newly created bedspread!
I just recently picked out this particular "Michael Miller" fabric for a new bedspread to inspire a new boys room. We are taking them from the animal theme to the transportation theme! Cars, trucks, airplanes, fire trucks, bikes and more!
I picked out the airplane in the fabric and drew a larger one on the canvas. I then painted the whole plane blue and added the yellow windows and surrounding flares. I recommend when you are first getting started to lightly draw with pencil your basic outline. Then, the options are endless! So, do you want to go paint something now??

Wednesday, June 8, 2011

Tutorial: Perfect Summer Shorts!

Today we are starting with elastic waist shorts. These are SO easy to make! Perfect for the new sewer! You can choose any type of fabric for these shorts. You can also replicate this idea if you are wanting to make pajama pants, long pants or a girls skirt.


First you need a Pattern! Take a pair of shorts that are a size you like.
Trace shorts on plain paper. Adding Length: Feel free to make them a little longer or shorter, depending on what you want to create.
Fold fabric in half~ right sides facing each other.
Trace 
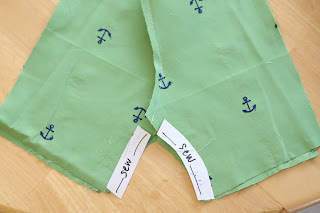
2 sets of the pattern. So you will have 2 folded pieces of fabric.


Sew from the waist of the shorts down to the crotch. Repeat on other piece.
Unfold both pieces and put right sides together. You should now have the outline of your shorts in front of you.
Sew from the bottom of the crotch down to bottom of the shorts on both sides.
Then sew the outside of the shorts on both sides. The line from the waist all the way down.


You are getting close!
If you have a serger on your machine, serge the edges of your shorts. If this sounds foreign to you like it did to me not too long ago, you are trying to make the edges of your material cleaner. You can use a zig-zag stitch for this too. If this is your first pair of shorts and you choose not to do this, that's okay!


HEM: After zig-zagging or serging the bottom of your shorts, you are ready to hem. Try the shorts on your child to mark accurately where you will be hemming.
Once you have marked your hem.
With right sides still together, fold the bottom of the pants up to your mark.
Sew right under the zig-zag or serge.


Voila you just hemmed your shorts!
Moving right along...
Elastic Waist: Don't let this scare you. It's easier than you think. Choose Elastic that is at least a 1/2" wide up to an inch. Turn shorts right sides out.
Fold the top of the shorts over and sew all the way around, leaving a 1/2" section to pull your elastic through.
Measure your child's waist. My son has a 20" waist, so I am using 21" of elastic to leave myself enough sewing room.
Hook a safety pin at the end of the elastic.
Using safety pin, push the elastic through the space you left in the waist of the shorts. It's okay if fabric gathers. When you are done you will be able to pull the fabric to fix it.
Almost there! Sew the elastic together and the space closed.
Trim all your leftover thread inside and out.
Voila! Look what you've created!!!
Time to try them on!!!!

Sunday, June 5, 2011

Tutorial: No Sew Fabric Flower


Snaz up your summer with one of these easy, NO SEW Fabric Flowers!

You'll Need:
fabric, felt, hot glue gun, headband of your choice or pin backing if you are making a pin for clothes. scissors
Full Tutorial below pictures:


Flower Base:
Cut 10, 3" circles out of the fabric of your choice. I chose white.
Cut 1, 2" felt circle out of the felt of your choice. I chose blue, for you to see better.
Cut 1, 1"x1/2" rectangle out of felt

To glue flower base onto felt:
Take 2 of the fabric circles, put them together. Fold in half. Put a dot of glue in the middle of the half circle. Fold in half again.
Put a dot of glue in the center of the felt circle. Glue on the fabric you just folded. Repeat 3 more times.

Center of the flower:
Take the last two pieces of fabric circles and fold and glue as you did above.
Put a dot of glue in the center of the four pieces.
Put pointy part of the last two fabric pieces on the glue and push.
VOILA!

To glue on headband:
Put felt part of flower on the headband in a place of your choosing.
Put glue on the 1"x1/2" felt rectangle and glue it onto felt circle.

Beautiful! You are done!!!